 The seven-step STEM Fab Studio process
Components and Connections
Stop-motion can be done with a smartphone, tablet, or laptop. There are scores of free or inexpensive apps that take minutes to learn but teach technology literacy transferable to more complex programs.
Like all animation, stop-motion has mathematical components, including the use of timelines and frame speeds to determine the flow and smoothness of movement. Stop-motion also connects to geometric principles involving symmetry and transformation through rotation, reflection, and translation.
Connections to science are not as obvious, but you can strengthen them through science-themed Big Ideas such as entropy, weather cycles, or cause and effect. There are several ways stop-motion can connect to engineering, but the most powerful is through Design Thinking.
 |
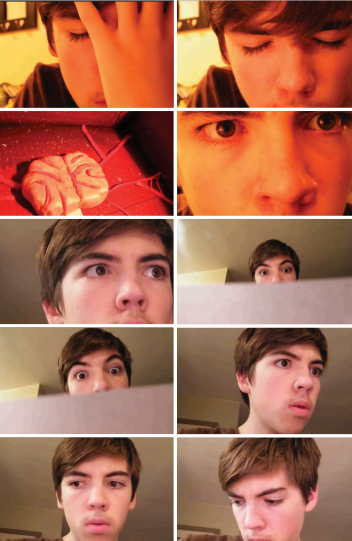
| Selected frames from Mind Games, a stop-motion animation from student Max Johnson. |
Design Thinking
Design Thinking is a problem-solving strategy often used by designers in both the arts and engineering fields. It is closely linked to metacognitive processes in other fields, such as the scientific method, experimental design, and the writing process. There are many versions of this process, but I prefer the STEM Fab Studio process created by Nick DiGiorgio for FabLab and the Cleveland City Public Schools. The steps are Ask, Imagine, Design, Build, Evaluate, Refine, and Share. This process is an excellent way for students to create their stop-motion animations. It gives them a way to be intentional in what they are creating and helps them when they hit a creative block. Let’s look at stop-motion animation through these steps:
1. Ask
Ask is where we conceptualize the problem facing the artist. This can be done through a teacher-generated Essential Question or a Big Idea where students develop their own question. It’s also where we set any creative constraints, such as the animation’s length, material considerations, or inclusion of the parts of a narrative.
This is also where students research their medium. To come up with a good idea for a stop-motion animation, you must understand what you can do with it. You can see one idea for stop-motion using sticky notes at the Web Link below.
2. Imagine
Imagine is where the artist comes up with possible solutions and includes as much divergent thinking as possible. My students were required to provide at least four ideas, but your students can come up with as many as they’d like. Just don’t let them get too attached to any one idea at this stage.
3. Design
Design is where you take those ideas, decide on an approach, and envision your solution. My students would present their ideas to a small group to get feedback before settling on one. Then they would write out a short script and provide a couple of sketches to determine the look of their animation.
4. Build
Build is the making of a prototype from your design. In animation and film, you make a storyboard—your animation in sketch form. Here, every important frame of the animation exists on paper. Camera angles and compositions are fully developed.
5. Evaluate
Evaluate is where we look at what we’ve built, test it, and assess it. At this point, students have not even shot their animations, but by evaluating early on, we take better advantage of the feedback.
6. Refine
Refine is where you respond to feedback. Depending on the feedback, you may be tweaking your storyboard or shooting your images. While time-consuming, shooting the photographs that make up your animation is easy. Just make sure you’re shooting enough images for your desired frame rate.
But, this process isn’t linear. We are now in the iterative design cycle, spiraling from Refine to Design and back again. The key is to not treat your ideas or art as precious. We build it, break it, and come up with something new as many times as necessary to come up with an elegant solution to our problem. Once our storyboard and photographs match what we want, we animate. There’s nothing to this—just arrange the photos in order, set your frame rate, and push Animate!
7. Share
This step is often overlooked, but what’s the point of the process without at least looking at the product? Host a film festival, enter the animations into contests, have them play on your school’s webpage. Let your students’ hard work shine!
Andrew D. Watson is fine arts instructional specialist for Alexandria City Public Schools in Alexandria, Virginia, and co-editor for this issue of SchoolArts. andrew.watson@acps.k12.va.us
NATIONAL STANDARD
Producing: Develop and refine artistic techniques and work for presentation.
View this article in the digital edition.


 The seven-step STEM Fab Studio process